
Victor Pelican Part 2
- Renegadenemo

- Jan 28, 2024
- 5 min read
With the wings made, Victor needed a body and the level of detail had now been established at higher than intended so it had to be right. I decided to make the back and shoulders first as I could do this as one piece and it would provide a guide and foundation for the breast and body, which was always going to be more complex.

I use a lot of CAD, though in my case it stands for Cardboard Aided Design, so this likely began as a piece of card, trimmed and shaped until I was happy with it then the part was cut from a piece of scrap aluminium and bent over a tube.
The next task was to shrink the sides. There are five things you can do with metal. Cut it, bend it, weld it, stretch it and shrink it. Four of the five are pretty straightforward but if you can master shrinking you can do all sorts of interesting things.

This might look a mess but it's actually partway though 'tuck shrinking' the edges. There's all manner of tools available to shrink metal and they're way less energetic than doing it this way but you know how sometimes you just want to go back to basics?
It works by gathering up the edge of the metal into a series of tucks then using a hammer to fix the edge into that shape. This traps the metal inboard of the edge and it can then be hammered into itself until the tucks vanish and the edge is shrunk. Think of the metal as just very stiff Plasticine and it's easy to imagine tucking up and edge then smoothing it into a nice curved shape. Same thing only with a hammer.

OK, there's a bit been done here, including stretching up the middle but that's easy. You just whack a big dent into it from the back and tap-tap away until you have a nice shape.
This bit fits here and covers all the unsightly rivets and edges across the centre of his back.

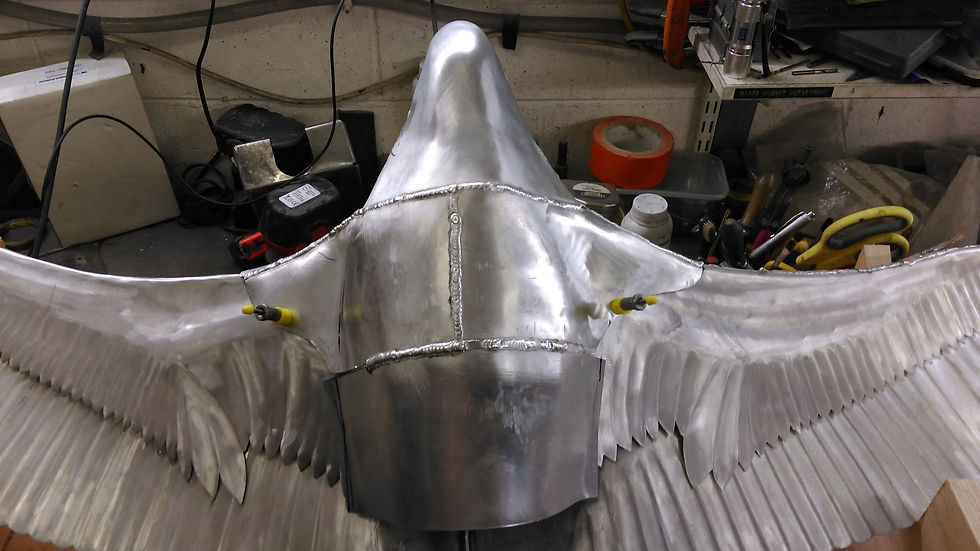
The shape is reasonably close now. It only needs some fine tuning and finishing touches. I cut and rolled some feathers into the back edges to blend with the wings then began a few experiments with his neck. That went through a number of iterations until I was happy with it. You can see an early attempt at the bottom of the pic held on with a couple of yellow pins.

His chin and lower neck came next. This also evolved from modelling clay experiments, bits of card and much trial and error until I was completely happy with the shape.

It looks simple enough until you have a look around the other side.


There's a number of different ways I could have made that shape. For example, I could have made it in two halves, but manipulating small pieces of material like that is awkward. I could have made a hardwood tool and drawn it over that as one but that's a lot of work. So I made it in lots of parts, welded them together, dressed the weld off then shrunk all the lumps and bumps out of it.
Next, the breast.

This was made in similar fashion, though less parts were involved. The shoulders were done in two and married up to the upper panel over the shoulders.
The section below it was made in one part with a stretch where it's welded to the shoulders to have the edges marry up. The lower edge was left smaller as by that point the body is beginning to taper towards the tail.
The next section down has a bulge in it so that was made in two. Trust me, it's easier that way.

The shape is good so far, only one piece to make to get all the way to the tail and it was a tricky one. Double curve and small and fiddly. This time I decided to make a simple tool for guidance and make the part from a single offcut.

If you look carefully at the edges of the part at the top of the picture you can see serrated marks in the material. These are from the shrinker. I could have tucked it as with the shoulders but that would have been a faff on such a small part so it went into the shrinker jaws that grab the metal and gather it up thus pulling the part into a bowl shape.

This section was given a flat back, welded in and used to provide a strong point by which the body could be pinned to the steel frame.

The only remaining parts for the body was the legs. More experimenting with shapes ensued. This time with lumps of plasticine stuck to the sides so I could add and subtract and push the shapes around until it looked correct from every angle. I also printed out a tail to the correct scale to gauge the size of the feet.

More CAD work to get an idea of the shapes of the pieces of material needed to make the legs.

Then make up and shape the necessary parts.

By making the welded seam longer than the upper and lower edges, it naturally wants to form a bowl shape when it's welded together. The edges were then shrunk and the finished part tweaked in and filed until it was a nice fit to the side of the body.

Another for his other leg and there you have a pelican body.

It was about this time that someone said there was a passing resemblance to a Victor bomber and its crescent wing and so Victor became Victor. The final job would be to finish all the welds and dress the entire assemblage to make it smooth all over but first a couple of finishing touches.

I decided a few more feathers were in order so more offcuts and some experimenting.

Below you can see that the welds are all complete now so it needs blended and finished until the joins are invisible and where smooth meets more feathery the otherwise well defined edges are lost. Also notice that the lower body has been cut away from the upper shoulders along the welds so it can be worked on from inside as well as outside. Once the shapes are perfect the upper and lower halves will be welded back together again and the finished part loaded over the centre of the wing section and welded in place.

So that's how Victor's body was put together. Next time I'll show his feet and his head as things went from difficult to, whose stupid idea was this? The only parts I didn't make over the years were his tail and the lower half of his back but those parts are coming along at long last so by the time I write up the head and feet he ought to be about finished.
Bill


Comments